Whenever the users buy a new computer or a printer. They have to connect these devices together. In order for them to work in synchronization. But at times users face a problem while doing so.
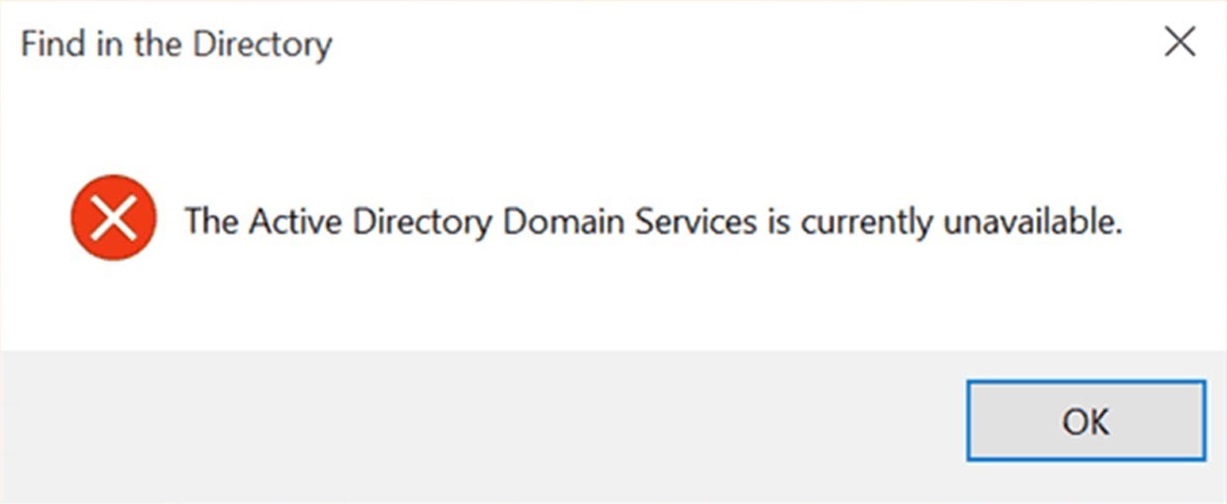
That is their computer shows an error “Active Directory Domain Services is currently unavailable” which means that the user’s computer is having difficulties in connecting to the printer. Which leads to the bump in the progress of the process.
Normally this problem arises when there is a problem with the permissions or drives or UAC or something else.
How to Fix The Active Directory Domain Services is Currently Unavailable in Windows 10
To help these users to fix The Active Directory Domain Services is currently unavailable problem on their own. There are some of the solutions listed below with proper guidance so the user can proceed with their suitable solution step by step.
Read Also:
Solution 1: Resetting Printer Spooler Settings
Every printer has software intact to it that looks after all printing requests and jobs. This software’s name is the Spooler device. Under normal circumstances, the spooler would show all the printing jobs list which would help the user to cancel any job which would be under processing.
Therefore, making the user do things for them with the item which are on the waiting list. Sometimes resetting the device settings would help the user to solve their problem with the connectivity. The following Steps should help the users to do so:
Step 1: The user has to open the Run dialog box [by pressing “window keys” and the “R key” together]. Then the user has to type “services.msc” in the box. Then press enter.
Step 2: A list of services would pop-up on the user’s computer screen. They have to find “Print Spooler”. Then the user has to bubble click on it to see its properties. Once its property opens up they have to click on “stop” [which should be under the system status] and then click OK.
Step 3: The user has to open “This PC” [they could use the shortcut window key +E key]
Step 4: They now have to follow the path below:
C:\Windows\System32\spool\PRINTERS
Note: If the user is showed any prompt regarding giving permission for using the above path then they have to press OK. As this permission is normal for using the path.
Step 5: Once the next window opens up. The user has to delete all the files in the “PRINTERS” section and then exit that window.
Step 6: The users have to go back to the Services tab and restart the “Printer Spooler” service which they had closed. Also, the user has to keep in mind that they have to start-up type as “Automatic”.
Step 7: Lastly, the user has to restart their computer and check if the printer connects correctly or not.
Read Also:
Solution 2: Adding Printer Manually and Updating Drivers
The users can try adding the printer device again to their computers. If restarting wouldn’t have worked. Sometimes it happens in this technological world that the two devices get connected automatically when the other devices are getting installed on the PC.
The user can always try updating the drivers and then adding the printer again to see if that solves their problem or not. Most of the time it has solved this problem as per the research. The following are the Steps for performing the above solution precisely:
Step 1: The user has to open the Run dialog box [by pressing “window keys” and the “R key” together]. Then the user has to type “CONTROL PANEL” in the box. Then press enter.
Step 2: Once the control panel opens up the user has to select “Large icons“ [they can do that by using the drop-down present at the top right side of the screen] after that the user has to select “Devices and Printers“.
Step 3: After the last Step the user has to find their printer, and then right-click on it which will open a list of actions then they have to select “Remove device“. After selecting that a UAC will pop up asking for the confirmation of the user’s actions as an administrator on the site.
Step 4: On every same window the user has to click on “Add a printer“ [which should be near the top of the screen]. After clicking on that a wizard should guide the user to how to add a printer to a computer.
Step 5: After that, the user has to find their printer’s original manufacturer’s official website where they can download the latest drivers for their printer’s The user has to open the Run dialog box [by pressing “window keys” and the “R key” together]. Then the user has to type “devmgmt.msc” in the box. Then press enter.
Step 6: The user has to go to the subcategory of “Print queues“, and then choose to expand it, after which they have to select their printer, and then right-click on it where they have to select and click on “Update Driver” amongst all the other options.
Step 7: After that, the user has to select the second option “Browse my computer for driver software” from the pop-up list of actions that would be shown on the user’s computer screen.
Step 8: The user then has to go to the location where they had downloaded the latest drivers for their printer from the website. Then they have to select it then start installing the thing by pressing “Next“. When the installation process is completed, then the user has to restart their computer and check if the problem is solved or sill is here on their computer.
Solution 3: Granting Access to Printer Ports and Windows
Sometimes the user’s computer hasn’t given access to come important permissions like printer ports. The users can try changing the permission files from the registry editor. The user can check this out if the above two methods failed to solve their problems.
The Steps below would help the user to guide themselves through this solution step by step:
Step 1: The user has to open the Run dialog box [by pressing “Window keys” and the “R key” together]. Then the user has to type “regedit” in the box. Then press enter.
Step 2: Once the window of the regedit opens up the user has to follow the path below.
HKEY_CURRENT_USER > Software > Microsoft > Windows NT > CurrentVersion
Step 3: The user has to right-click on the “Devices” which will show on the window that pops-up after the last Step. After clicking on the devices, the user has to select “Permissions”.
Step 4: The user has to find its account click on it and wait for the new window to open. Where the user has to check all the boxes under Allow and the user has to remember and make sure no boxes under DENY should be checked.
Step 5: The user has to repeat the above Step for all the entries in the section of “Printer-Ports” and “Windows“.
Step 6: The user lastly has to restart the thing and see if the problem is still there or not.
Solution 4: Recognizing Printer using Other Applications
Sometimes the computer can be using another device as a printer. Which may cause some problems in connectivity.
The following Steps would help to solve the problem:
Step 1: The user has to right-click on the desktop and then select New and then Text Document.
Step 2: The user can type anything that they want in the blank space given. For example- we click File and then Print.
Step 3: Now after the last Step a window listing all the printer’s names that the device had installed would be displayed. The user has to find its own printer’s name. and if they can’t, they can find it by searching for it in the search option on the top.
By that, the computer will start searching for more devices and hopefully, the user’s printer would be found. And hence solve the problem.
Read Also:
- Video Editing Software
- Data Recovery Software
- Avast Service High CPU Usage
- Best Cloud Hosting Services
Conclusion
Hopefully, the solutions helped some users. The user can also make sure its computer is updated completely. And there are no pending updates. And the user can also try troubleshooting the printer to solve the problem.