The following article will help you out to fix the Windows Error Code 0x80070570, including all the major and minor details of each fix and the most probable causes behind it. You might face this error while updating your system and try to install a new one.
Windows 7 is Microsoft’s one of the most user-friendly versions of Windows OS (Operating System), which makes the users update it and install the latest version. But installing the new version might not be easy as it comes with dozens of errors.
We will be discussing the most common error you might face while updating your system, which is- Windows error code 0x80070570.
Ignoring errors like these should not be one of your options. These errors affect the performance of your system and might lead to the corruption of the system; hence, you should always go for fixing them.
The following article will clear all your doubts related to error- 0x80070570.
Read Also:
- ERR_CACHE_MISS
- NVIDIA Control Panel Missing
- This Site Can’t Be Reached
When Does 0x80070570 Error Occur?
If you are installing a Microsoft update or installing Windows from the start, then this error might occur in the middle of the installation and leads to termination of the process. On the occurrence of this error, you will find a message which reads that some files cannot be installed, and then your installation process stops.
Generally, this error occurs in three different situations. We have categorized the different situations for you below:
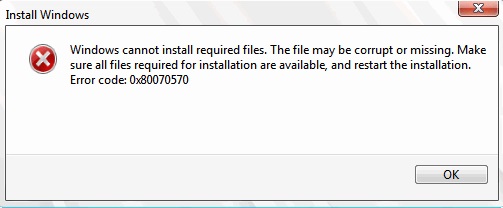
Type 1 – In the first type, while installing Windows 7, you will see a message that reads-Windows cannot install required files. The file may be corrupt or missing. Make sure all files required for installation are available and restart the installation. Error code: 0x80070570.
Type 2 – Recently, a new update for Windows 10 was provided by Microsoft, but some of the users failed to update their system and faced an error that said- Some refresh records are missing or have issues. In this article, we’ll try to fix the error which arises whenever you try to update it again.
Type 3 – You might face this error while transferring your files from one storage to another due to some issues in your hardware or software. It leads to the corruption of the file and the unread-ability of the file.
You might observe that this error message will display a detailed description of the error along with the numeric code.
Why Does The 0x80070570 Error Occur?
Several reasons can cause error 0x80070570. We have made a list of the multiple common reasons which cause this error:
Reason 1 – Your system might fail to process the essential files or the settings required for the installation or, your installation disk can be a damaged one or be corrupt.
Reason 2 – If there is an error in the registry settings or the required registry files are corrupt or missing, then the application might fail to locate the files required for installation.
Reason 3 – If the files are deleted and are in the Recycle Bin, then the system might fail to locate them, or the user might try to remove some files in some specific folders, which is strictly prohibited by the system.
Reason 4 – The system might inappropriately recognize the SATA (Serial Advanced Technology Attachment) drivers who are built-in while the installation process is under process.
Reason 5 – Viruses or malware can seriously affect your system. It can restrict any action done by the computer or can restrict any action you do to the computer. While downloading anything, or surfing over the internet, browsing through a page, checking your emails, etc.
These viruses enter your system. Viruses have the capability of stealing personal information, deleting files, or modify your data.
How To Fix Windows Error Code 0x80070570?
So far, we have covered many details of this error, such as why is it caused, when can you face this error, what are the types of such circumstances, and many more.
Now we will come across the most effective fixes for this error so that you can resume your installation without any further delay.
Type 1 – Windows 7 Installation Error Code 0x80070570
We will now dive into the detailed fix of the first type of error Code 0x80070570, which is the Windows 7 installation problem. 4 different methods, given below, can fix this type of error:
Method 1 – Prevention Is Better Than Cure
While installing Windows 7, a corrupted ISO file on a compact disk or a USB drive or a faulty compact disk or a damaged USB Drive can cause this error, and such faulty drives should be avoided.
If you wish to install Windows 7, try using a fresh new drive with the latest ISO file. In case you are using a compact disk, then use one burned with a copy of Windows and Microsoft products with a legal license key.
This method will most probably reduce the chances of the occurrence of a particular error. Burning your compact disk all by yourself can be a good option, but we recommend you keep some points in mind.
You should burn the compact disk at low speed, as the chances of errors to occur reduces at low write speed. An old compact disk has a lot of chances to be damaged. Hence, you must use a CD of high quality.
Method 2 – Retry Windows Installation
Re-installing Windows will be the best option to go for if the error occurs even after using a perfect compact disk or a USB. But again, you should use the latest ISO file before the re-install. Updated BIOS to the latest version is also essential to avoid this error.
While installing Windows, you must ensure that no hardware is connected to the system, such as a printer, microphone, speakers, external CD drive, etc. as any hardware interruption increases the chances of error occurrence.
In the installation, Wizard clicks on the “Install Now” button. If the error still exists, cancel the installation and start the installation from fresh.
On completion of this process, Windows will be installed on your system.
Method 3 – Running Chkdsk In Windows RE
You will have to restart your system and boot it again with the installation disk. Follow the steps below to execute this method:
Step 1: Firstly, insert the installation disk in the system’s optical drive and reboot your computer.
Step 2: Secondly, if you’re asked to press some keys to run Windows Installation, then press it.
Step 3: Next, you will have to set the language according to your desired preference. Then, select – “Repair my computer” option.
Step 4: You will have to then, select the correct installation that requires any repair, and then click on the Next button.
Step 5: You will now see the menu, which will show the option of- “System Recovery.” Open the command prompt by clicking on it twice.
Step 6: You will see the command prompt now, type- “chkdsk/f/r” and hit the enter key. Wait till the repair process is completed.
Step 7: Finally, select Y to reboot your computer, and your work will be done.
Method 4 – Changing The BIOS Settings
The error 0x80070570 has many causes for its occurrence, but one of the rarest causes is due to improper setting of the BIOS. It is a very simple fix, and you need not worry, just follow the steps mentioned below:
Step 1: Firstly, you have to boot your computer into BIOS. During the boot, you will find a piece of prompt information on the screen, which says that in order to enter the BIOS, you have to enter a key from the keyboard (usually F2).
Step 2: You must read the information provided and enter the relevant key to enter the BIOS setting.
Step 3: Next, go to the Drives option and then select the SATA option. You will now have to make some modifications, by changing “RAID Autodetect-AHCI” to” RAID Auto detect-ATA” and save this change.
Step 4: Come out of the BIOS and retry the Windows installation.
Method 5 – Cleaning The Registry
The registry has all the settings, options, and entries for software and hardware. Registry checks whether your system runs properly and efficiently or not. Hence, if there are any damage files or any corrupt files, then the Registry fails to work, giving rise to many errors, and the error 0x80070570 could be one.
Fixing this error can be just one easy task if you follow the given instructions carefully. You will have to clean the system’s Registry. It can be done manually or even by any third-party tool.
The manual process is way more complicated and requires a number of professional operations, but still, you can give it a shot. Just be pretty sure that all your files in the system are backed up so that if anything goes wrong, you will not lose your data.
Type 2 – Windows Update KB3116908 Failed To Install Error Code 0x80070570
In certain cases, when you have a cumulative update for Windows 10, this type of error occurs, which restricts the update. If this error is repetitive while installing Windows, then you must carefully follow the steps mentioned below:
Step 1: Open the C Drive of our system and follow this particular path-C:\Windows\SoftwareDistribution\Download
Step 2: You will find a number of folders on your screen. Look for a39ba752a8aa7203217c75802d7fddd.
Step 3: Delete this folder (Log in as the administrator to delete it).
Step 4: Reboot your system and try to install this update again.
So far, we have discussed all the methods for fixing the error 0x80070570 error that occurred while installing Windows, but as discussed earlier. This is not the only circumstance where you will face this issue.
This error might also occur when you transfer files or delete them; hence, we will now further dive into the fixes of the error while you transfer or delete files.
Type 3 – Error0x80070570: The File Or Directory Is Corrupted And Unreadable
This type of error might occur in between the process of the transfer of the corrupt files or the unreadable files. Given below are some of the effective methods provide for you to resolve this error.
Method 1 – Search for Virus
Viruses and malware can steal information, delete files, or even manipulate your data; this can lead to an error while you transfer or delete your files. Hence, to fix this issue, you must scan your system and check for the presence of any virus to remove it immediately if you find it.
The firewall should be enabled for scanning the virus. You must install good Anti-Virus software on your system and activate it as soon as possible. It should hopefully resolve your issue if certain viruses caused the error.
Method 2 – Check For The Drivers Installed And Update Drivers
Drivers play an important role in the tasks you perform in the system. Hence, your system should have all the essential Drivers installed, and you must also see to it that they are updated with the latest version, or else you might fail to transfer your files.
Given below are certain steps for you to see if the Drivers are working fine or not:
Step 1: Firstly, on the desktop right-click on the My Computer icon and then click on Properties.
Step 2: Secondly, you have to look for the Device Manager tab on the left panel of the new Window opened.
Step 3: You will be shown with all the devices present. Click on all of them and check if your drivers are working properly or not.
Step 4: If your Driver is obsolete, then you will find an option “Update Driver” in the Driver tab. Click on it and update your driver.
Method 3 – Reduce the Fragmentation of The Hard Disk
The data stored in your hard drive is not placed well in an organized way and follows no order of arrangement. Hence, de-fragmenting the hard drive will make it easy for you to access all the parts of your hard drive. Follow the steps below to defragment your hard drive
Step 1: Firstly, open Control Panel from the Start menu and go to the System and Security option.
Step 2: Secondly, you will find an option to defragment your hard drive. Click on it.
Step 3: You will be taken to a Defragment Window, where you will have to click on Analyse Disk Button. It starts checking if defragmentation is required or not.
Step 4: If the need to defragment your hard drive arises, then click on the Defragment Disk button.
Method 4 – Lost Data Recovering
If none of the above methods works out for you, then you need not be panic as we have got you one last fix for you to resolve the 0x80070570 error. The above methods wouldn’t be of any significant help for you, maybe because some partition of the drive became unreachable, and the essential data might be in such partitions.
Hence, we have to recover that data from those unreachable partitions. Eassos Recovery Free is free software that we recommend to you to scan the inaccessible data and eventually restore the data.
You should carefully follow the below-mentioned steps to restore the data:
Step 1: Firstly, install and open the software, which will help us recover our data.
Step 2: Secondly. Select the appropriate required recovery mode by clicking on the corresponding button.
Step 3: Next, select the partition which is most likely suppose to have your essential file. Then, hit the Next button. It may be a slow process as it usually takes some time, but you have to be patient as the time taken here depends on the size of the partition.
Step 4: Then, you will be shown all your unreachable files.
Step 5: Click on the Recover button in order to recover all your inaccessible files.
Read Also:
- 0xc0000005
- CTF Loader
- System Thread Exception Not Handled
Conclusion
We have provided you with some of the best methods to resolve your problem, including the different types of reasons for the occurrence of the 0x80070570 error. Hopefully, our solutions to this issue will help you to the best of your satisfaction.
 And How To Fix It")